
Nice work, Leon!
I use a home-made tool for embedding the ridges in the miliput. A 1.5 inch long piece of evergreen tube (about 1.5mm in diameter) into one end of which I cut a grove and then glued a small rectangular piece of scrap photo-etch about 1mm in width. Takes patience to create the ridges but the benefit of this approach is that you have more control over the pattern and can apply it to surface parts that a larger, more regularised tool might not be able to reach, e.g. between the exhausts at the rear of a panther, and in the gaps inside the pioneer tool clusters on the sides.
The trick with the miliput is to let it set sufficiently long to adhere to the plastic surface and firm sufficiently to be able to shape and flatten out, but not so long that it hardens up and becomes difficult to work with. I give it about 15 minutes of curing before adding the ridges, usually having two small sections at a time on the go, the second, most recently applied section setting whilst I go back to first section to shape the putty to the surface and apply the ridges.
Takes a while but the results have thus far been far superior to photoetch or resin zimmerit sets, and plastic moulded zimmerit. You can chip it too to create small areas of battle damage where the red primer shows through.
Zimmeritt

Re: Zimmeritt
Many thanx for the guide Fred, I will make a tool and give it a go......Hincmar wrote: ↑Sun Feb 18, 2018 8:02 pm Nice work, Leon!
I use a home-made tool for embedding the ridges in the miliput. A 1.5 inch long piece of evergreen tube (about 1.5mm in diameter) into one end of which I cut a grove and then glued a small rectangular piece of scrap photo-etch about 1mm in width. Takes patience to create the ridges but the benefit of this approach is that you have more control over the pattern and can apply it to surface parts that a larger, more regularised tool might not be able to reach, e.g. between the exhausts at the rear of a panther, and in the gaps inside the pioneer tool clusters on the sides.
The trick with the miliput is to let it set sufficiently long to adhere to the plastic surface and firm sufficiently to be able to shape and flatten out, but not so long that it hardens up and becomes difficult to work with. I give it about 15 minutes of curing before adding the ridges, usually having two small sections at a time on the go, the second, most recently applied section setting whilst I go back to first section to shape the putty to the surface and apply the ridges.
Takes a while but the results have thus far been far superior to photoetch or resin zimmerit sets, and plastic moulded zimmerit. You can chip it too to create small areas of battle damage where the red primer shows through.
Greatness is not in where we stand,
but in what direction we are moving,
we must sail sometimes in the wind,
and sometimes against it,
but sail we must, and not drift nor lie at anchor.
but in what direction we are moving,
we must sail sometimes in the wind,
and sometimes against it,
but sail we must, and not drift nor lie at anchor.

Re: Zimmeritt
Handsome IV/70 empecinado 
Im afraid I cheat...................from an article I wrote a few years back.
The latter was sorted by making a moulding tool.
Taking some milliput, a fair sized blob the turret side was dusted with talc and the
milliput pushed onto the side of the turret. Carefully after dusting with talc( don't want to score the finely done merit)the milliput was cut down to an oblong the same dimensions as the hull front.
The cut milliput was then formed into a ball, the in situ milliput cleaned of talc and the ball moulded onto the oblong to form a two fingered 'grip' handle.
This was all left to dry. Needless to say if you try this don't use heat to set the milliput faster!
Once it had been drying for 2-3 hours the oblong was gently teased off ( toothpick good tool for this as wont scratch the plastic) then it could be set properly with some extra heat.
Then a layer of milliput was added to the hull front to a nice smooth finish, dusted with talc and then impressed with the made tool. And there you have it a nice reproduction of zimmerit Left to dry for a couple of hours then a couple of patches made with toothpick while still not fully set.
Sharpend shaped toothpicks for those hard to reach bits. Its very therapeutic because you just have to take it slow, each section has to dry before you can do the next, very zen lol
Dragon Tiger II's have acres of lovely zim
L
Last edited by Adler on Sun Feb 18, 2018 10:31 pm, edited 1 time in total.
Re: Zimmeritt
Another great technique, many thanx for posting... 
Greatness is not in where we stand,
but in what direction we are moving,
we must sail sometimes in the wind,
and sometimes against it,
but sail we must, and not drift nor lie at anchor.
but in what direction we are moving,
we must sail sometimes in the wind,
and sometimes against it,
but sail we must, and not drift nor lie at anchor.
Re: Zimmeritt
following this with great interest - does anyone have any photos of the tool they created? I am having trouble visualizing it
Re: Zimmeritt
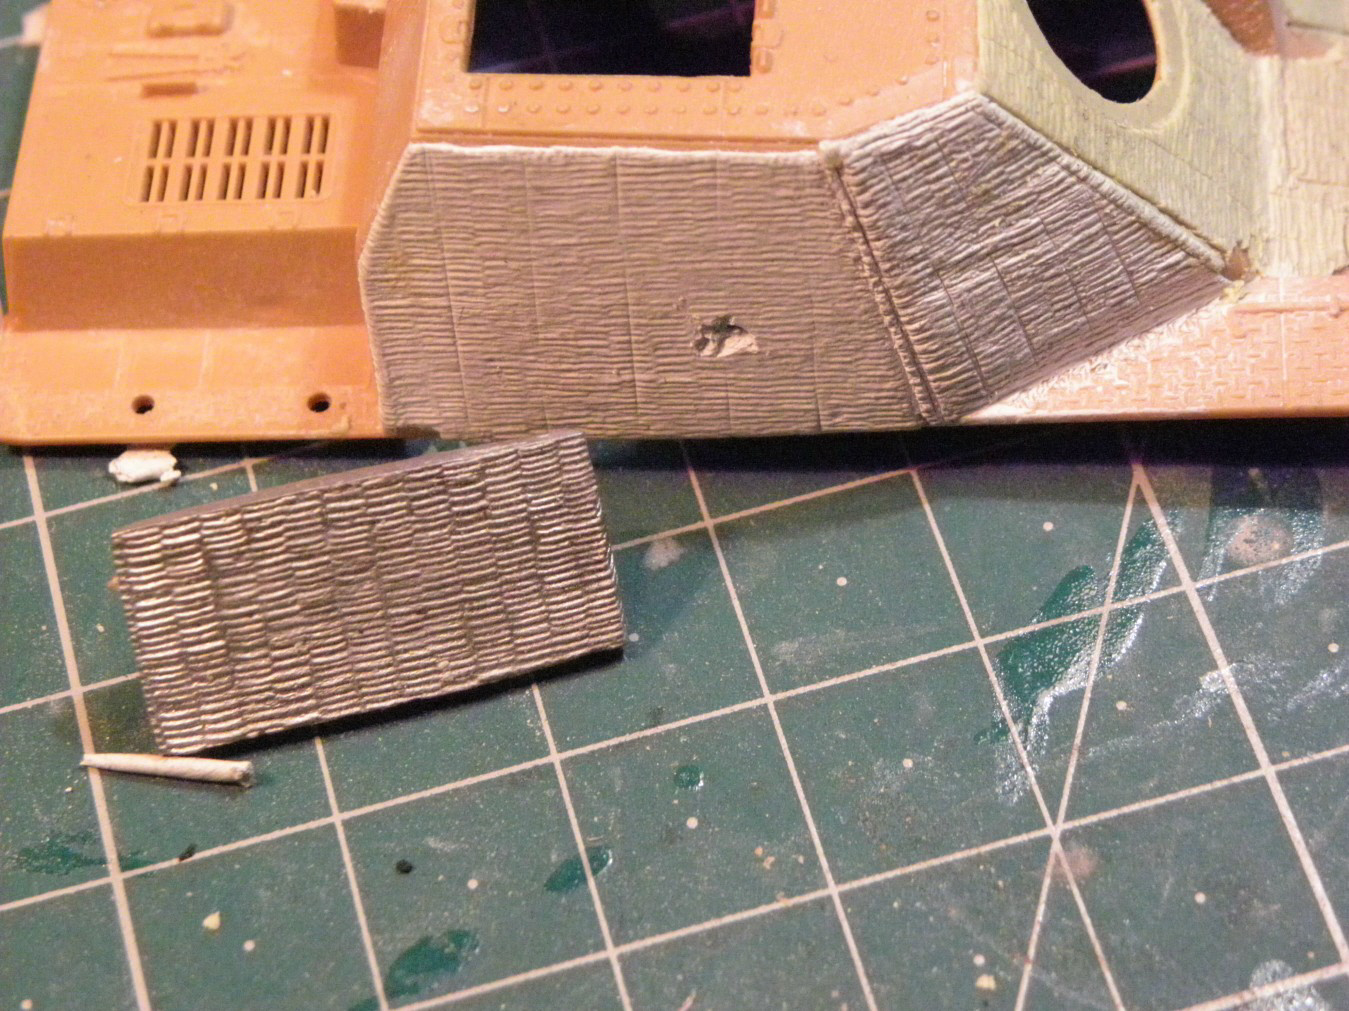
Well this is a pic of a tool made by the above method
L
L
Re: Zimmeritt
a very delayed thank you Leon for posting that picture - sounds like you pressed the milliput onto a zimmerit pattern on a pre-build Dragon to make the master? Do I have that correct? If so, that sounds like a great idea, may try that myself!